Easy 3D Model Creation with VRoid
Make Your Own VRoid
Game design is extremely complex, with all sorts of things to be taken care of like X, Y, Z, and even W!
It's actually a bit difficult to tell just how complex making a game is by playing it, but lemme tell you, there’s a lot going on.
One of those things, too, is the visual element, particularly the characters, double particularly character design. Unsurprisingly, users are going to focus on this aspect of the game likely more than anything else (though environment or HUD probably comes 2nd or 3rd). And this alone is a pretty complex process. Usually I draft something in Procreate, then export to Unity in which I’ve got to do some major work in animating the thing, and all of this is great and all but, let's be honest, not the best looking solution.
Which is why I was happy to run across this video on character creation and animation from Youtuber Gamesfromscratch. Not perfect by any means, but an awesome start and easy to boot, this is the sort of thing I look for when developing my toolset for game dev. Using just a free account, you’re able to create a working character model in very little time. The video says 10 minutes, but that’s sort of a ballpark - I took about 9.
Booting Up VRoid Studio

The first thing to do is download Vroid Studio - a free made-in-Japan app to create 3D models of humanoid avatars.
Vroid Studio was originally created as a means to allow VR chat users a quick way to make avatars for VR chat, a popular online virtual world platform. You might have also seen these models used in YouTube videos, as the term “Vtuber” has become synonymous with using the Vroid models as a type of mo-cap to imitate body and lip movement from the YouTuber. This allowance of advanced tools maintained within a VRM model also serves as a great resource for game developers.
Getting Started
After you download and install Vroid Studio, open it up and select “create new”.
You can then start from a Fem or Masc base model. I was just looking to get a quick prototype so I selected Fem and got to work.
The character customization is immense. As Vroid is used to create that anime style character in 3D, your results will probably end up being some derivative of a Japanese anime-style character, but this gives us an extremely powerful character base to start with that has a lot of features under the hood - such as a default humanoid bone set-up and ready-to-go rigging for different animations.
Navigating the Editor

Once the model is loaded, rotate it by holding down the right mouse button and dragging.
You can also horizontally move across the screen with shift + drag or center mouse button + drag. At the top left, you can see that the editor is divided into 6 tabs, which can be navigated by mouse click or via F1, F2, F3, F4, F5 and F6.
- F1 - Face Editor
- F2 - Hair Editor
- F3 - Body Editor
- F4 - Clothing Editor
- F5 - General Editor
- F6 - Camera/Exporter
Character Creation
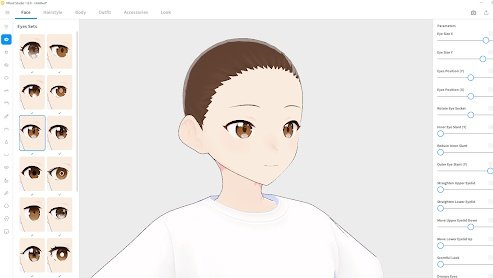
Vroid comes preloaded with many alluring anime Face Sets and a plethora of parameters to tune for each.
So much so, that you could make extreme stylistic changes from the original Vroid base model to match a custom style of your choice, or you could take the time to recreate styles found in other popular titles such as Genshin Impact (which is also rumored to have used Vroid Studio to create all of it’s initial character models):
Back to the editor, Face Sets, Eye Sets, Irises, a total of 17 sets can be customized with seemingly endless parameters on the right of the screen:
Color Palettes

When I started getting into eye color, I realized I needed a color palette to keep things within the same visual style.
A color palette is a powerful user experience tool that sets the tone of the design, so being able to create an effective color palette makes you a sneaky master of creation. So I jumped over to coolors.co to search through some fool-proof palettes to help with my design.
As Coolors boasts on their own website, it is an essential tool for creating and collecting color palettes. It allows you to generate perfect matching colors in seconds. Even if you are not so skilled in design!

Coolors is a great tool for anyone working in web development and game design, and helps us to build out our visual style quickly for rapid prototyping - and reskinning!
With the above palette in hand, moving through all of the customization options under Face became very easy. I was able to to quickly pick and cycle through different colors that worked for Irises, Eye Highlights and Eyebrows.
Hairstyling

The goal here is to make a game-ready character, and I really enjoyed the selection of different hair-styles.
In fact, many of the available styles are reminiscent of the Star Ocean JRPG. I’m a big fan, so this was a bonus that I very much appreciated.
You can start off with a Hairstyle Set, and then further customize the front, back and unique extensions and ahoge of the hair, which can bring more personality to your character.
Outfits

Finally, Vroid Studio also comes pre-built with a variety of outfits to get your started.
Although, for games, we are going to want a potentially extreme wide variety of clothing, armor and accessories, this tutorial is just to get us started with a game character that we can iterate on in the future. Vroid Studio does have dedicated marketplaces for clothing and accessories, and if you want to venture into the world of 3D modeling even further, we can edit these models in Blender to further customize clothing and accessories.
But I’ll leave that for a future dedicated tutorial.
Texture Mapping

Unique clothing and textures can even be created in Vroid.
By navigating from Clothing → Tops, we can edit the texture map of the sweater contained inside the first Clothing set:
Similarly, the texture map for Bottoms, Inner Top, Inner Bottom and Shoes can also be edited - basically making it possible to draw any texture that you can think of.
For now, I just changed the color of the sweater to better match my color palette by editing the texture under Tops.
Exporting VRMs
Finally, in order to get this into Unity, Blender and ready for animations, we need to export the model as a VRM file.
Click the “Export as VRM'' at the top right of the Vroid Studio screen. It may take a while for the model to get ready for export (these are fairly complex models!). Once finished, click Export.
And bam! We have a fully riggable, ready for humanoid animation 3D model. Completely free and of our own design.
VRoid Complete!

The next tutorial will walk you through how to import this model into Unity so that we can apply animations to it and much more!